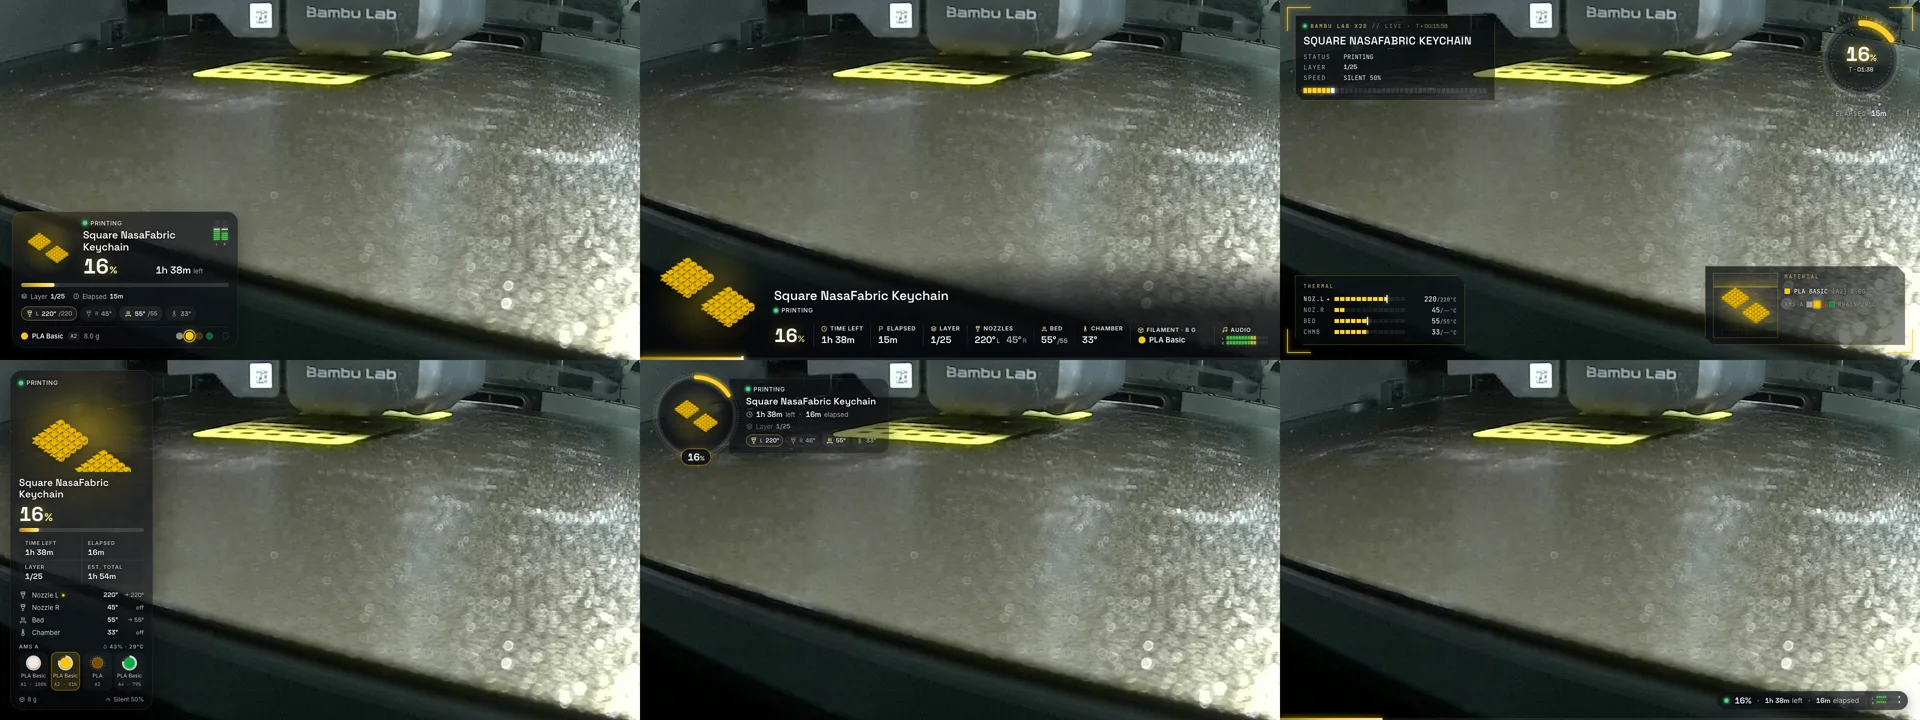
A 3D printing stream on Twitch shows a printer and not much else: no progress, no temperatures, no hint of what the model will be. This Bambu Lab OBS overlay adds all of that from the printer's own status reports, under one rule from the first prompt: the overlay may listen to the printer, but never tell it anything.
A stream that explains itself
The setup is a Bambu Lab X2D, its camera in OBS, and a stream on Twitch. OBS crops the 1920×1080 camera down to 1280×720, both to zoom in and to keep encoding light. The request was a set of switchable, semi-transparent layouts with progress, time left, temperatures, the model being printed and the filament, read live from the printer. Two references came with it: bambu-printer-manager and bambu.local.
“Use all connections read-only, no actions should be ever performed on the printer for safety”
From the first prompt to Claude Code
The result is a small local server and a transparent web page that OBS loads as a browser source. The printer pushes a full status report every second; the server turns it into a layout. Once per job it downloads the sliced .3mf file from the printer to show the slicer's plate preview, the filament and the grams. It also pans the camera crop in OBS when a print starts and ends, and draws a two-channel, Winamp-style audio meter from OBS's own levels. The camera stays an ordinary OBS source; the overlay only draws on top of it.
Two hours to a first version, then the stream took over
Claude Code built it in one terminal session on the streaming Mac, reached through chatcode.dev. The first version, with six layouts, the camera crop and the meter, was pushed about two hours after the first prompt. That evening, a real print on stream found two bugs no test had covered. The full prompt log is in PROMPTS.md.
-
1
Make read-only a property of the code
Instead of a general MQTT library, the agent wrote a minimal client whose send function only accepts connect, subscribe, ping and disconnect packets. It cannot publish anything, not even the usual “send me everything” request. The file channel that fetches the
.3mfallows three read commands, and the printer's access code is only sent after the TLS certificate names the expected printer, so a device that inherits the old IP address never sees it. Tests check that the client cannot publish and that the file channel refuses everything else. -
2
macOS hides the network from background processes
The printer answered
ping, but Python got[Errno 65] No route to host. The owner pasted the matching hint from the bambu.local README and reported back: “No python in the list.” A process started from a background terminal has no app for macOS to ask, so it never shows up under Local Network. The fix was a 160-line Swift menu-bar app that runs the server as its child. macOS asked once, and the next message was “I clicked Allow.” -
3
Taste decides what viewers see
The agent proposed an ETA; the owner replaced it: “ETA doesn't make sense on live stream since it's time zone dependent. Could be time elapsed instead.” Maker credits and model links went off by default, and the lower third gave its empty lower-left corner to a large model preview. The meter took three more rounds: no container, then less height, then horizontal bars, until “Much better now!”
-
4
The stream found a race
On stream, the overlay said Plate 3/4 but showed plate 1. The job had started at 19:25:38, the overlay fetched the model at 19:25:39, and the printer only saved this job's
.3mfat 19:25:42. The file it found was a same-named one from a morning print of plate 1, and the code quietly fell back to that plate. Now it waits for a file newer than the job, rejects any file without the job's plate, and refetches previews cached by the old logic. -
5
Record before you guess
After the last layer, the printer kept saying “printing” while it purified the chamber air. Rather than guess which field marks the end, the agent recorded every change in the printer's reports through the end of a print. The last layer came at 20:22:37, then filament unloading, then stage 66, “Purifying chamber air”. The printer reported
FINISHonly at 20:26:15. The overlay now treats the last layer at 100% as done. On that print, the camera would have panned back three and a half minutes earlier, and the label now reads “Print complete · Purifying chamber air”.
What the Bambu Lab OBS overlay runs on
Printer, read-only
- MQTT over TLS, subscribe-only, one full status report a second
- The file channel Bambu Studio uses, to download the job's
.3mfonce - SSDP, listened to passively, to follow the printer to a new IP address
Server
- Python 3.10+, standard library only, in one file of about 1,800 lines
- Server-sent events push state and meter levels to every open page
- 29 offline tests, including a fake OBS and the read-only guarantees
Overlay
- Plain HTML, CSS and JavaScript on a 1280×720 stage scaled to fit
- Six layouts, with an accent colour taken from the filament
- A control panel for layout, options and crop, from any device on the network
OBS
- obs-websocket, built into OBS 28 and later
- Crop: only the top and bottom of the camera source, eased over two seconds
- Audio meter from OBS's volume events, skipping muted inputs
What made the collaboration work
- One safety sentence, up front. The read-only rule in the first prompt decided the architecture, before any layout existed. Adding it later would have meant replacing the printer client.
- Screenshots of the real stream. Most visual corrections came with a screenshot of the actual stream, which showed what matters at 1280×720 better than any description.
- Corrections in mid-flight. Several prompts arrived while the agent was still working, such as “There's no external storage connected to X2D, only internal” or “MugenRadio is backup, it's muted now”, and changed the approach without a restart.
- Evidence before fixes. Both evening bugs were diagnosed from the printer's own data, file timestamps and a recording of its reports, before any code changed. Each fix came with a test.
- Human calls stay human. No ETA, no credits by default, what the meter should look like, and when the repository went public under MIT were the owner's decisions.
Not everything worked the first time. The first downloads over the file channel came back corrupted, because each chunk carried an extra separator. An accent colour defined on the wrong element kept the layouts teal whatever the filament. On loud music the meter sat pinned at the top until it was rescaled around the running loudness. Before the repository went public, its whole history was checked for the access code, the printer's serial number and the OBS password. None of them appear.
Run the demo, or point it at your printer
Without a printer, the server starts in demo mode and plays a simulated print. You need Python 3.10 or later:
git clone https://github.com/chatcode-lab/bambu-overlay.git
cd bambu-overlay
python3 server.py
# open http://127.0.0.1:8787/preview?demo=1 (add &layout=hud to switch layouts)
With a printer on a Mac, put its IP address and LAN access code from the printer's screen into .env, then build and open the menu-bar app (it needs the Xcode command line tools). In OBS, add a Browser source for http://127.0.0.1:8787/ at 1280×720. For the crop and the meter, enable Tools → WebSocket Server Settings.
cp .env.example .env      # printer IP + access code
./tools/build-app.sh
open "Bambu Overlay.app" # allow local network access when askedSix layouts and a control panel